
We will wait for a bit for folks to trickle in. In the mean time I was wondering if anyone tried the hands free lube dispenser I talked about last month? Any questions about it?
#EdenDIY - Club Meeting: Wood Storage Box. Tuesday, June 19th at 7pm EST.
06/19/2012

Now, now, none of this:
My fingers will get slippery and I won't be able to type.
My fingers will get slippery and I won't be able to type.
06/19/2012
Quote:
That is for the refresh button, might need to lube it up for tonight.
Originally posted by
Petite Valentine
Now, now, none of this:
My fingers will get slippery and I won't be able to type.
My fingers will get slippery and I won't be able to type.
06/19/2012

I'm here and really excited to see this!!!
06/19/2012
Quote:
I personally didn't, but that's mostly because of the way we use our lube. I use miniscule dabs (less than a pumps worth) when playing solo, whereas my husband will up end a bottle and squeeze away into the toy he intends penetrate.
Originally posted by
ToyTimeTim
We will wait for a bit for folks to trickle in. In the mean time I was wondering if anyone tried the hands free lube dispenser I talked about last month? Any questions about it?
06/19/2012

Late, but here!
06/19/2012
Quote:
Welcome! I hope you like it.
Originally posted by
lovekink
I'm here and really excited to see this!!!
06/19/2012
Quote:
Makes sense to me.
Originally posted by
Petite Valentine
I personally didn't, but that's mostly because of the way we use our lube. I use miniscule dabs (less than a pumps worth) when playing solo, whereas my husband will up end a bottle and squeeze away into the toy he intends penetrate.
06/19/2012
Quote:
Only a minute or two.
Originally posted by
Ansley
Late, but here!
06/19/2012

Oh boy! I can't wait
06/19/2012

Evening all! Hi Tim!
06/19/2012
Quote:
I still thought the project was kick ass.
Originally posted by
ToyTimeTim
Makes sense to me.
06/19/2012
I liked it too! We just haven't picked up a hands free dispenser yet.
06/19/2012
Quote:
Hey buddy, good to see you! Thanks for the retweet by the way. Appreciate it.
Originally posted by
Kindred
Evening all! Hi Tim!
06/19/2012
OK, let’s get the ball rolling shall we? Now I have a lot to cover so I’ll be posting pretty fast, but still feel free to ask any questions you may have. Also, I will post some trivia for you and towards the end of the meeting I may have a couple of GC’s to hand out. So, y’all ready? Hope so because here we go!
06/19/2012
Quote:
Thanks! I had not heard mush about it so that is why I asked.
Originally posted by
Petite Valentine
I still thought the project was kick ass.
Well, get one Melan!e. lol
06/19/2012
Let's do this!!
06/19/2012
To begin, you have to decide what kind of wood you want to make the box out of and what kind of finish. There are lots of woods to chose from, some more expensive than others. I chose Pine for my box but my store also carries Maple, Oak, Cedar and Poplar. Each has different grains or looks to the wood. Now if you plan to paint the box this may not matter as much but do consider the life of the box. Hard woods like Oak and Maple will hold up better over the long term. Furthermore, my store carries wood boards that have a primer coat of paint already applied, so if you plan to paint your box that will save you a step or two there.
Next thing you need to think about is what size of box you want to make as this will dictate the size of board to buy. For the sake of simplicity I went with a 3/4” thick X 6” wide board (Actual size is 5 1/2”), using my plan this will make a box 7” tall. I decided that 9 1/2” inside would be enough for my needs. As such, the board was cut into 11” long pieces. Confusing, right? Let me explain, the inside measurement is the overall length minus the thickness of the boards. In this case the boards measure 3/4” thick, so 3/4” X 2 = 1 1/2”. So, since I wanted 9 1/2” inside I just added 1 1/2” to get 11”. If this still confuses you, feel free to send me the measurements you would like, the thickness of the boards you will be using and I’ll be happy to figure it all out for you.
Ever wonder why a 2X4 does not measure 2” X 4”? Actually when the board is cut before drying it is cut to 2” X 4” but after it is dried to the required moister content the wood shrinks in size to just a tad over the 1 1/2” X 3 1/2” standard dimension. The rest is planed off so that the final dimensions is right at 1 1/2” X 3 1/2”. This is also why my 6” board is actually 5 1/2”.
06/19/2012
Quote:
I know, I know. I'm on it
Originally posted by
ToyTimeTim
Thanks! I had not heard mush about it so that is why I asked.
Well, get one Melan!e. lol
Well, get one Melan!e. lol
06/19/2012
Great idea
06/19/2012
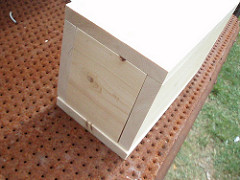
OK, so you have decided on the type of wood you want and the size. Now, for the folks that do not have a garage full of tools or a saw to cut the wood with, you only have to take a trip to your local Home Depot or Lowes (other hardware stores may offer this too). Both stores will cut your board to length for you at no charge. Just let them know which board you want and the size of the cuts. This can also sometimes save you money as some boards are sold by the foot, so you will only pay for the boards you need. While you are there pick up two hinges, a handle for the lid, a small box of 1 1/2” Finish nails and a clasp or lock. Ask the store associate to help you select the hinge and clasp that will work for your box. More on that in a bit.
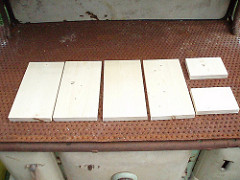
For my box I have cut 4 boards 11” long and two that are 4” long.
Hyperion is the name of a coast redwood (Sequoia sempervirens) in Northern California that was measured at 379.3 ft (115.61 meters), which ranks it as the world's tallest known living tree. Wiki
For my box I have cut 4 boards 11” long and two that are 4” long.
Hyperion is the name of a coast redwood (Sequoia sempervirens) in Northern California that was measured at 379.3 ft (115.61 meters), which ranks it as the world's tallest known living tree. Wiki
06/19/2012
At this point I like to use a sanding block to smooth any rough cuts and or edges like these.
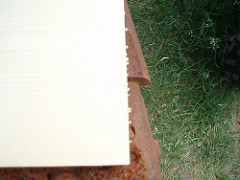
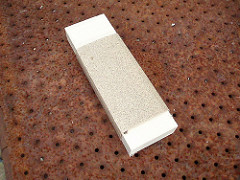
You can buy a sanding sponge or block and a few sheets of 100 grit sand paper or just the sheets and make your own sanding block from a scrap of wood. Really, anything hard that the sheet will wrap around will work for a sanding block. I made one just to show you what it will look like.
Sand your wood smooth on the edges and round off any sharp corners. This is a personal preference thing; some folks like rounded corners some like them squared off. When possible sand in the same direction as the grain (lines in the wood), this will help with the finished look. Sanding cross grain will leave lines that can be seen through the stain. If you are painting your box you only have to get the edges the way you like them.
The oldest living tree, the Methuselah a Great Basin bristlecone pine is said to be over 4800 years old. Wiki
06/19/2012
Everyone keeping up? Don't want to lose anyone.
06/19/2012

Quote:
Yep!
Originally posted by
ToyTimeTim
Everyone keeping up? Don't want to lose anyone.
06/19/2012
I'm with ya
06/19/2012

Quote:
keeping up!
Originally posted by
ToyTimeTim
Everyone keeping up? Don't want to lose anyone.
06/19/2012
Still following!
06/19/2012
Quote:
Still with ya.
Originally posted by
ToyTimeTim
Everyone keeping up? Don't want to lose anyone.
06/19/2012
Cool! On we go
Now it is time to assemble the box. I will start with the bottom board; I start with this one because if my marks are hard to get out it will not matter to much as they will not be seen. To make things uniform I like to lay out where the nails will go. For this I just use a tape measure and a pencil. My boards are 3/4” thick and I want the nails to go through the center of the matting board so I measure in 3/8” (3/4” divided by2) from the edge on the narrow side. I used a roofing square to draw the line but you can just make a mark at each side of the board and use a ruler to draw the line. Go ahead and mark all four sides this way. Do not press hard with the pencil; you just want a soft line you can see. This will help later when you need to erase the line. Now from the edge of the board measure in 3/4”, this is where the side board will be. From that mark measure in 1/2” (or just 1 1/4” from the edge) and make a small mark. Do this to both sides of each end.
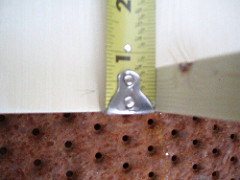
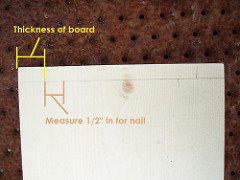
For the long side of the board I measured in 3/4” on each side and marked the middle (length divided by 2). Now to make assembly easy I started all the nails and drove them trough until the points where just coming through the other side a little bit. This will help in the next step.
The Dwarf Willow (Salix herbacea) is one of the smallest woody plants in the world. It typically grows to only 2 1/4” in height and has round, shiny green leaves less than 3/4” long and broad. Wiki
Now it is time to assemble the box. I will start with the bottom board; I start with this one because if my marks are hard to get out it will not matter to much as they will not be seen. To make things uniform I like to lay out where the nails will go. For this I just use a tape measure and a pencil. My boards are 3/4” thick and I want the nails to go through the center of the matting board so I measure in 3/8” (3/4” divided by2) from the edge on the narrow side. I used a roofing square to draw the line but you can just make a mark at each side of the board and use a ruler to draw the line. Go ahead and mark all four sides this way. Do not press hard with the pencil; you just want a soft line you can see. This will help later when you need to erase the line. Now from the edge of the board measure in 3/4”, this is where the side board will be. From that mark measure in 1/2” (or just 1 1/4” from the edge) and make a small mark. Do this to both sides of each end.
For the long side of the board I measured in 3/4” on each side and marked the middle (length divided by 2). Now to make assembly easy I started all the nails and drove them trough until the points where just coming through the other side a little bit. This will help in the next step.
The Dwarf Willow (Salix herbacea) is one of the smallest woody plants in the world. It typically grows to only 2 1/4” in height and has round, shiny green leaves less than 3/4” long and broad. Wiki
06/19/2012
Now comes the hard part, you have to hold one of the sides under the board lined up so the edges are smooth. If you happen to have an extra hand this is not too hard but with only two it is next to impossible. lol
What I did was to set the other side board in place to support the other side.
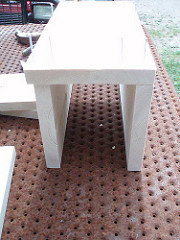
Start at one corner and carefully hammer the nail in making sure the edges are flush and the nail goes in straight. This is where the nails sticking through the board a bit helps, just line up the edges and push down on the board and the nail point will keep it in place. Now that one corner nail is in, make sure the edges are flush at the opposite end and drive that nail in. Do the same for the other side board. This side will be much easier to hold since the other side is secured. You can now attach the side boards in the same fashion.
The tallest wooden structure is the Trestle. It is the world’s largest structure composed entirely of wood and glue laminate. It is 600 feet tall (12 stories) and constructed of 6.5 million board feet of lumber. Wiki
What I did was to set the other side board in place to support the other side.
Start at one corner and carefully hammer the nail in making sure the edges are flush and the nail goes in straight. This is where the nails sticking through the board a bit helps, just line up the edges and push down on the board and the nail point will keep it in place. Now that one corner nail is in, make sure the edges are flush at the opposite end and drive that nail in. Do the same for the other side board. This side will be much easier to hold since the other side is secured. You can now attach the side boards in the same fashion.
The tallest wooden structure is the Trestle. It is the world’s largest structure composed entirely of wood and glue laminate. It is 600 feet tall (12 stories) and constructed of 6.5 million board feet of lumber. Wiki
06/19/2012