
So, nails only at the corners (so far), not along the edges?
#EdenDIY - Club Meeting: Wood Storage Box. Tuesday, June 19th at 7pm EST.
06/19/2012

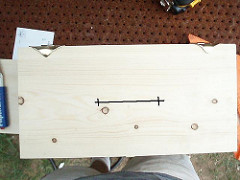
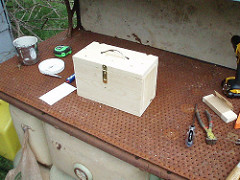
OK, so we have all four sides secured to the bottom board. All that we have to do know is nail the side boards to each other. If you want you can layout the nail holes like we did before. Another option is to make a template out of some stiff paper like this (you can also do this for the bottom board).
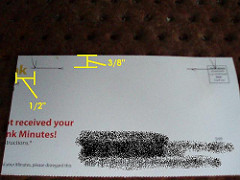
I used a advertisement that came in the mail. Just layout the measurements on this, you can then just lay it on the boards where needed and mark with a nail by pressing it through the paper.
Here I have placed it on one corner; I set it back a bit so you can see.
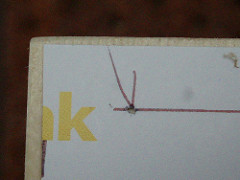
This will be done on the front and back sides of the box. Once you have the holes marked you can flush up the seams and hammer the nails in.
I used a advertisement that came in the mail. Just layout the measurements on this, you can then just lay it on the boards where needed and mark with a nail by pressing it through the paper.
Here I have placed it on one corner; I set it back a bit so you can see.
This will be done on the front and back sides of the box. Once you have the holes marked you can flush up the seams and hammer the nails in.
06/19/2012
Quote:
For the sides (Small ends) I figured only two were needed. On the long sides I added one in the middle.
Originally posted by
Petite Valentine
So, nails only at the corners (so far), not along the edges?
06/19/2012
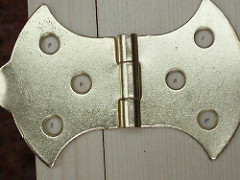
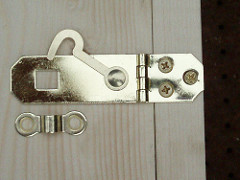
Now we are ready for the lid, let’s start with the hinges. I used two that I had laying around the garage, looking at them on the box I realized they were too big to fit on the lid properly.
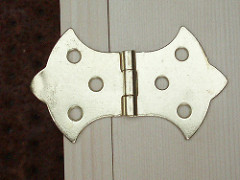
As you can see the top of the hinge extends past the wood. This is where thinking ahead (or asking for help) can save you some problems. Since I am a cheapskate I went ahead and used them anyway. In a minute I’ll show you how I fixed them.
What you need to do is mark where you want them to go, I measured in 1 1/2” from each side and made a mark so that the edge of the hinge was on the mark. Then holding the hinge down I made marks with the pencil where the screws go. Using one of the finish nails I made starter holes for the screws by driving them in a little ways and them using a pair of pliers I pulled the nails out. This makes starting the screws much easier.
Without the hinge, screw the screws in about half way in all the holes. Once you have all the holes started you can place the hinge on the box and secure them down with the screws. Be sure not to over tighten the screws as you may strip out the wood which will not be good.
Once you have both hinges ready you can flip the box over so we can do the clasp.
The Oldest Wooden Schoolhouse is a wooden structure located at 14 St. George Street in St. Augustine, Florida near the city gate. It is touted as being the oldest wooden school building in the United States. The exact date of construction is unknown, but it first appears on tax records in 1716. Wiki
06/19/2012
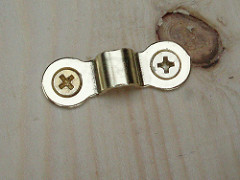
The clasp is attached the same as the hinges, make a mark in the center of the lid and place the clasp on the mark. Mark the screw holes and use a nail to make the starter holes.
Now that I have the clasp attached to the lid I can place the loop to the main body of the box. To do this you only have to place the loop into the hole of the clasp and then hold the loop down and carefully lift the clasp. Once it is high enough you can use a finger under the clasp to hold the loop in place. Mark and run the two screws in.
The handle for the lids is done in the same fashion. Mark the center, measure the handle mounting holes and mark. I used a handle that has two bolts that hold it on; these require drilling a hole through the lid. But you can buy handles that attach just like the hinges and clasp.
You box is now ready for finishing! Check the lid to make sure it works smoothly and the latch.
Remember my hinges that did not fit right? I used a hammer and bent the tips over the top of the board after I had everything the way I wanted.
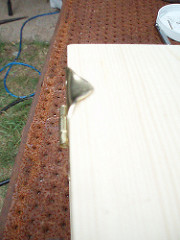
My box after final tweaks to hinges and clasp.
Did Homo erectus take wood shop? An assemblage of 1.5-million-year-old stone hand axes unearthed in Tanzania says yes, contends Manuel Dominguez-Rodrigo of the Universidad Complutense, Madrid, who recently excavated the tools at Peninj, a site west of Lake Natron. The axes, worn from heavy use, bear traces of acacia wood on their blades, the world's earliest evidence for woodworking. archaeology.org
Now that I have the clasp attached to the lid I can place the loop to the main body of the box. To do this you only have to place the loop into the hole of the clasp and then hold the loop down and carefully lift the clasp. Once it is high enough you can use a finger under the clasp to hold the loop in place. Mark and run the two screws in.
The handle for the lids is done in the same fashion. Mark the center, measure the handle mounting holes and mark. I used a handle that has two bolts that hold it on; these require drilling a hole through the lid. But you can buy handles that attach just like the hinges and clasp.
You box is now ready for finishing! Check the lid to make sure it works smoothly and the latch.
Remember my hinges that did not fit right? I used a hammer and bent the tips over the top of the board after I had everything the way I wanted.
My box after final tweaks to hinges and clasp.
Did Homo erectus take wood shop? An assemblage of 1.5-million-year-old stone hand axes unearthed in Tanzania says yes, contends Manuel Dominguez-Rodrigo of the Universidad Complutense, Madrid, who recently excavated the tools at Peninj, a site west of Lake Natron. The axes, worn from heavy use, bear traces of acacia wood on their blades, the world's earliest evidence for woodworking. archaeology.org
06/19/2012
Now, to prepare the box for staining (or paint) you will want to take the hinges, clasp and handle off. Place them in a bag with the screws so you do not lose anything.
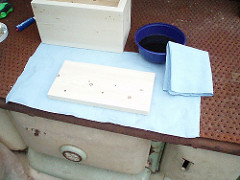
For a stain I was looking for something that would be safe in case some of it transferred to a toy. Kyoto Angel sent me a link to a web site that had safe, all natural and non-toxic stains to use on wood. I chose to use coffee as a stain, mostly because I had some already and I was curious to see how it would work. Prepare your work area with a towel or something that will keep unwanted spills from getting all over.
For a stain I was looking for something that would be safe in case some of it transferred to a toy. Kyoto Angel sent me a link to a web site that had safe, all natural and non-toxic stains to use on wood. I chose to use coffee as a stain, mostly because I had some already and I was curious to see how it would work. Prepare your work area with a towel or something that will keep unwanted spills from getting all over.
06/19/2012
I used compressed air to blow off any dust left on the wood, you can buy Tack Rags that will do th same thing. When staining this is not as crucial as when painting as the stain will need to be lightly sanded. Whereas with paint the dust left over will be seen through the paint and will leave the finish uneven or bumpy.
I had the leftover coffee from the morning and applied it using a rag I had. The instructions on the website stated to leave it on for a time and wipe off when you think it is the color you wanted. If it is not dark enough you can add more.
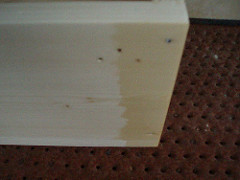
The first coat was pretty light so I brewed up a stronger batch. I used my regular amount of coffee grounds but only four cups of water. It did give me a slightly darker stain but not what I was expecting. I think you would have to really make a SUPER STRONG pot of coffee to get it real dark. At any rate, I went ahead and spread the coffee all over the box and lid, let it dry and applied a second coat.
As you can see it is not all that dark, more like a natural color of stain. Oh well, at least it was pretty cheap and it is safe.
After the coffee had dried I did a light sanding with 200 grit sand paper to smooth out the surface. After removing the sanding dust, I then sprayed on a coat of polyurethane with a satin finish just to the outside. The inside I will leave as it is.
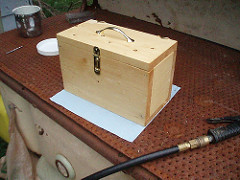
Here is my finished box
I had the leftover coffee from the morning and applied it using a rag I had. The instructions on the website stated to leave it on for a time and wipe off when you think it is the color you wanted. If it is not dark enough you can add more.
The first coat was pretty light so I brewed up a stronger batch. I used my regular amount of coffee grounds but only four cups of water. It did give me a slightly darker stain but not what I was expecting. I think you would have to really make a SUPER STRONG pot of coffee to get it real dark. At any rate, I went ahead and spread the coffee all over the box and lid, let it dry and applied a second coat.
As you can see it is not all that dark, more like a natural color of stain. Oh well, at least it was pretty cheap and it is safe.
After the coffee had dried I did a light sanding with 200 grit sand paper to smooth out the surface. After removing the sanding dust, I then sprayed on a coat of polyurethane with a satin finish just to the outside. The inside I will leave as it is.
Here is my finished box
06/19/2012

What was the link to that site? I'm interested to check out others.
06/19/2012

Looks very nice!
06/19/2012
Would you advise staining the pieces before assembly?
06/19/2012

I like the color of your stain but I too was thinking coffee would be darker.
06/19/2012
Quote:
moneypit.com
Originally posted by
Melan!e
What was the link to that site? I'm interested to check out others.
I am going to try a few of the others some day, I am thinking that blueberries or raspberries would be cool.
06/19/2012
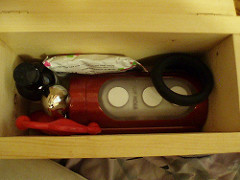
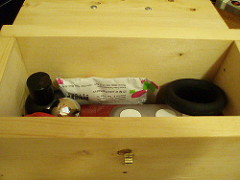
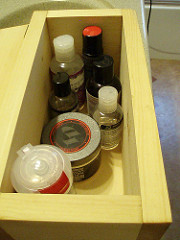
I tossed in some toys so you can see what can be put inside this size of box. The first shows some toys I might take on a trip or something like that and the second shows a few bottles of lube. You can see there is lots of room for more toys.
06/19/2012

That looks super nice!
06/19/2012

Quote:
Ya that would definitely make a good stain.
Originally posted by
ToyTimeTim
moneypit.com
I am going to try a few of the others some day, I am thinking that blueberries or raspberries would be cool.
I am going to try a few of the others some day, I am thinking that blueberries or raspberries would be cool.
06/19/2012
Quote:
You could and it may be a bit easier. If you apply a finish like the polyurethane it will seal all the seams so it may no matter much.
Originally posted by
Petite Valentine
Would you advise staining the pieces before assembly?
06/19/2012

Ack, here I am! Glad I didn't miss it even if I am a little late...
06/19/2012
Quote:
Right?
Originally posted by
lovekink
I like the color of your stain but I too was thinking coffee would be darker.
06/19/2012
I'd love to see how either of those turn out. Post pics when you do try them, k?
06/19/2012
Well, that’s my toy box. All the materials I used for this box only cost about $14 ($4.62 for board, $2.58 for the handle, $2.47 for clasp, the hinges will cost you about $3.00 for a pair and a can of polyurethane will be around $4.00). Pretty cheap eh?
Any questions or comments?
Any questions or comments?
06/19/2012
I wish I was mechanically inclined.. I get tons of booboos when I try to be handy.
06/19/2012
Quote:
or maybe a different type of bean. An espresso maybe would make it darker?
Originally posted by
ToyTimeTim
Right?
06/19/2012
Quote:
Glad to see ya! Better late than never.
Originally posted by
Jake'n'bake
Ack, here I am! Glad I didn't miss it even if I am a little late...
06/19/2012
Quote:
It's awesome!
Originally posted by
ToyTimeTim
Well, that’s my toy box. All the materials I used for this box only cost about $14 ($4.62 for board, $2.58 for the handle, $2.47 for clasp, the hinges will cost you about $3.00 for a pair and a can of polyurethane will be around $4.00). Pretty cheap
...
more
Well, that’s my toy box. All the materials I used for this box only cost about $14 ($4.62 for board, $2.58 for the handle, $2.47 for clasp, the hinges will cost you about $3.00 for a pair and a can of polyurethane will be around $4.00). Pretty cheap eh?
Any questions or comments? less
Any questions or comments? less
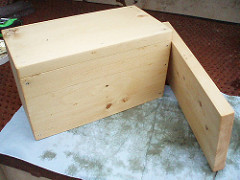
What's the thinnest board you think would be safe to use for this type of project?
06/19/2012
Quote:
I will, might have to do a meeting on it.
Originally posted by
Melan!e
I'd love to see how either of those turn out. Post pics when you do try them, k?
06/19/2012
Quote:
So true!
Originally posted by
ToyTimeTim
Glad to see ya! Better late than never.
06/19/2012
Quote:
Oooh DIY eco-staining!
Originally posted by
ToyTimeTim
I will, might have to do a meeting on it.
06/19/2012
Quote:
Well my dear, this could be done with just glue. Then you would only have to drive a few screws in. It would take a bit more time and a few clamps though.
Originally posted by
wrmbreze
I wish I was mechanically inclined.. I get tons of booboos when I try to be handy.
06/19/2012

Quote:
I think I need more of a toy chest at this point.
Originally posted by
ToyTimeTim
I tossed in some toys so you can see what can be put inside this size of box. The first shows some toys I might take on a trip or something like that and the second shows a few bottles of lube. You can see there is lots of room for more
...
more
I tossed in some toys so you can see what can be put inside this size of box. The first shows some toys I might take on a trip or something like that and the second shows a few bottles of lube. You can see there is lots of room for more toys.
less
less
06/19/2012
Quote:
This is awesome! I'm going to go out and get everything and when my husband sees me trying to do it he'll be forced to help me! DIY has become motivational!
Originally posted by
ToyTimeTim
Well, that’s my toy box. All the materials I used for this box only cost about $14 ($4.62 for board, $2.58 for the handle, $2.47 for clasp, the hinges will cost you about $3.00 for a pair and a can of polyurethane will be around $4.00). Pretty cheap
...
more
Well, that’s my toy box. All the materials I used for this box only cost about $14 ($4.62 for board, $2.58 for the handle, $2.47 for clasp, the hinges will cost you about $3.00 for a pair and a can of polyurethane will be around $4.00). Pretty cheap eh?
Any questions or comments? less
Any questions or comments? less
06/19/2012