
Any questions so far?
#EdenDIY - Christmas Coasters DIY with AirenWolf
12/18/2012
Alright moving on!
The Holder
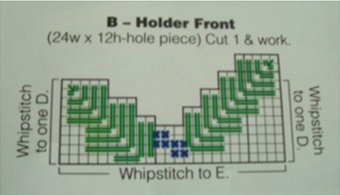
This diagram is by far the hardest piece to cut. Cut a square 24 holes wide by 12 holes high. Be sure to count the last hole as full and cut outside this hole!
You will be tempted to start with the left side of the diagram, but I advise starting with the right side. The right side will be taller than the left side.
First count 5 holes over from the side and cut a notch at that point. Then cut the rest of the fabric away leaving the five holes. Alternatively you can cut down two rows and then cut the fabric away. You can do this for the first three rows, but then it becomes trickier.
The Holder
This diagram is by far the hardest piece to cut. Cut a square 24 holes wide by 12 holes high. Be sure to count the last hole as full and cut outside this hole!
You will be tempted to start with the left side of the diagram, but I advise starting with the right side. The right side will be taller than the left side.
First count 5 holes over from the side and cut a notch at that point. Then cut the rest of the fabric away leaving the five holes. Alternatively you can cut down two rows and then cut the fabric away. You can do this for the first three rows, but then it becomes trickier.
12/18/2012

Quote:
I may make some in the colors that you suggested and then some in white and yellow or gold. Something like an angel theme.
Originally posted by
Airen Wolf
Any questions so far?
12/18/2012
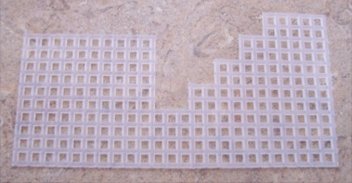
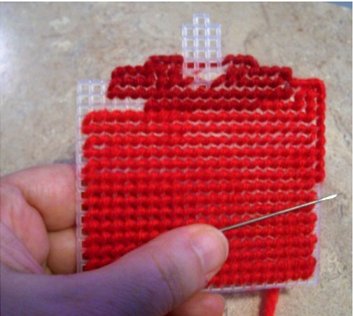
As you can see I cut away the first three rows at the top according to the diagram. From that point I had to remember that the other side of the diagram needs to be left alone.
I notched my way down the fabric and carefully cut away row by vertical row. Once I reached the bottom three holes I was home free and simply counted my way; cutting carefully, to the top of the rows.
12/18/2012
Quote:
That would be gorgeous! If you do then take some pics and post them on this thread. That would be awesome.
Originally posted by
XxFallenAngelxX
I may make some in the colors that you suggested and then some in white and yellow or gold. Something like an angel theme.
12/18/2012
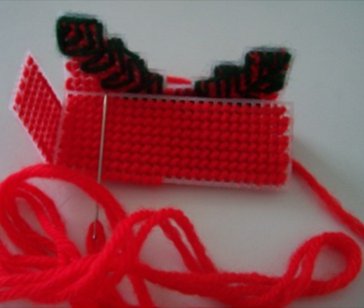
This is what the finished piece will look like and what the rest of the holder pieces will look like as well.
You will need to cut two pieces of canvas 9 holes wide by 9 holes high for the sides of the holder, and two pieces 24 holes wide by 9 holes high for the bottom and back of the holder.
12/18/2012
I have to bookmark this page so I can come back later and do these steps! Do you do a lot of canvas pieces?
12/18/2012
Fill each of the pieces of the holder with the scarlet yarn in the continental stitch.
Normally it is fine to drag the tail of the yarn over the back of the fabric because you can tack it down when you cover the edges but for the front holder piece do not draw the scarlet yarn tails of the yarn across the openings on the front piece as they will be visible on the finished piece if you do.
When all of the holder pieces are worked in scarlet set aside the side pieces, back and bottom piece.
Work the holly motif by following the pattern on the diagram above and instead of knotting your yarn simply work over the tail as before. Work the holly berries in the wine colored yarn as full cross stitches over the scarlet half cross stitch.
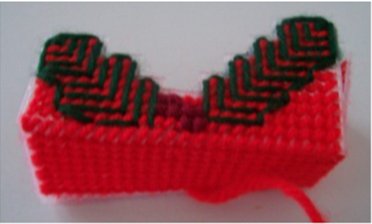
This is what the front piece should look like after you outline the holly in the running back stitch.
Normally it is fine to drag the tail of the yarn over the back of the fabric because you can tack it down when you cover the edges but for the front holder piece do not draw the scarlet yarn tails of the yarn across the openings on the front piece as they will be visible on the finished piece if you do.
When all of the holder pieces are worked in scarlet set aside the side pieces, back and bottom piece.
Work the holly motif by following the pattern on the diagram above and instead of knotting your yarn simply work over the tail as before. Work the holly berries in the wine colored yarn as full cross stitches over the scarlet half cross stitch.
This is what the front piece should look like after you outline the holly in the running back stitch.
12/18/2012
Quote:
I do quite a bit actually. I make boxes for all my toys out of plastic canvas. I also do counted cross stitch and crochet.
Originally posted by
XxFallenAngelxX
I have to bookmark this page so I can come back later and do these steps! Do you do a lot of canvas pieces?
12/18/2012
Quote:
Excellent idea!
Originally posted by
Airen Wolf
I do quite a bit actually. I make boxes for all my toys out of plastic canvas. I also do counted cross stitch and crochet.
12/18/2012
Do you make adult sized crochet hats?
12/18/2012

Quote:
I was going to do padded pouches. I never thought of using plastic canvas.
Originally posted by
Airen Wolf
I do quite a bit actually. I make boxes for all my toys out of plastic canvas. I also do counted cross stitch and crochet.
12/18/2012
To assemble the holder place the pieces so that the back side of each piece will face the inside of the holder. Whip stitch through both pieces of the canvas according to the diagram below.

Outline in scarlet the edges of the holder and the edges of the holly leaves in green to finish the holder.
The right side of the holder front piece will be taller than the side when the holder is complete.
Set the holder aside after manipulating it until it stands properly on its own.
Outline in scarlet the edges of the holder and the edges of the holly leaves in green to finish the holder.
The right side of the holder front piece will be taller than the side when the holder is complete.
Set the holder aside after manipulating it until it stands properly on its own.
12/18/2012
Quote:
I have before but no one in my family actually likes wearing a hat! I have made a sweater a year for my girls for most of their lives though.
Originally posted by
XxFallenAngelxX
Do you make adult sized crochet hats?
12/18/2012
Quote:
I love them because they stack easily and even my glass toys are protected. That and when you look under my bed there is just a plastic tub with a whole bunch of pretty boxes.
Originally posted by
SneakersAndPearls
I was going to do padded pouches. I never thought of using plastic canvas.
12/18/2012
Quote:
It sounds like under your bed is certainly prettier than mine!
Originally posted by
Airen Wolf
I love them because they stack easily and even my glass toys are protected. That and when you look under my bed there is just a plastic tub with a whole bunch of pretty boxes.
12/18/2012
Quote:
That's great! I've always wanted to learn crochet but I never had the chance. I can do the chain stitch but that's it.
Originally posted by
Airen Wolf
I have before but no one in my family actually likes wearing a hat! I have made a sweater a year for my girls for most of their lives though.
12/18/2012
Whew! That's the holder assembled. It is the hardest part of the whole thing. If you really get frustrated simply make the front piece straight across and follow the diagram to work the holly and berries. It looks a bit chunkier but it stands a bit easier. All in all it won't look bad at all.
If you do make it just a straight piece count up from the bottom of the fabric to sew the holly.
If you do make it just a straight piece count up from the bottom of the fabric to sew the holly.
12/18/2012
Any questions so far?
12/18/2012
Quote:
I learned when I was at a babysitters house. She would sit and crochet all day and I was curious so she taught me. I love doing it when my hands will let me...I tend to death grip the crochet hook. LOL
Originally posted by
XxFallenAngelxX
That's great! I've always wanted to learn crochet but I never had the chance. I can do the chain stitch but that's it.
12/18/2012

Gah I nearly thought I had missed this!
12/18/2012
Quote:
I purchased some hooks from Amazon a while back that weren't the most popular, the hook was more curved on them and they seem to help with me holding them. I bought lots of supplies and then never finished teaching myself, lol..
Originally posted by
Airen Wolf
I learned when I was at a babysitters house. She would sit and crochet all day and I was curious so she taught me. I love doing it when my hands will let me...I tend to death grip the crochet hook. LOL
12/18/2012
Quote:
Incidentally if you want to create your own diagram of the piece simply use a piece of large size grid paper. Make a mark in the corresponding "holes" of the grid and voila! That way you can make it whatever size your poor eyes will do best with.
Originally posted by
Airen Wolf
Any questions so far?
12/18/2012
Quote:
Hey there welcome welcome!
Originally posted by
ScarletFox
Gah I nearly thought I had missed this!
12/18/2012
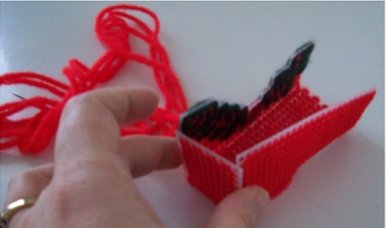
Here's some pics of the holder as I was sewing it:
12/18/2012
Now for the star of the show:
The Coasters
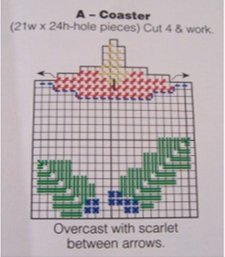
Each of the four coasters starts off as a rectangle 21 holes wide and 24 holes high.
Following the diagram cut the candle wick by notching ten holes into the side and cutting away the excess fabric. Do the same for the other side. Be careful not to cut through this top piece as you work your way down to cut out the rest of the wick.
The Coasters
Each of the four coasters starts off as a rectangle 21 holes wide and 24 holes high.
Following the diagram cut the candle wick by notching ten holes into the side and cutting away the excess fabric. Do the same for the other side. Be careful not to cut through this top piece as you work your way down to cut out the rest of the wick.
12/18/2012
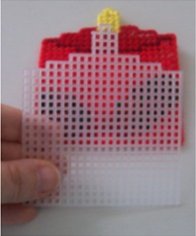
This is a pic of a completed coaster and a bare form.
12/18/2012
To work the coasters begin by using the continental stitch in scarlet in the left bottom corner of the piece.
Work up rows 1- 15 completely covering the rows.
At this point leave the tail of scarlet yarn to the side of the piece and take up a length of the dark red yarn. Join the red to the plastic canvas according to the pattern diagram and work 10 stitches.
Follow the diagram to add the rest of the stitches running the yarn behind the piece to skip where the yellow for the candle flame will go.
You will work the yellow stitches over the dark red yarn in a moment. When you have completed the dark red stitches over cast the edges of the piece in the dark red according to my picture below:
12/18/2012
Quote:
Thanks for these useful photos. They help so much!
Originally posted by
Airen Wolf
This is a pic of a completed coaster and a bare form.
This is a pic of a completed coaster and a bare form.
12/18/2012
Almost done! We will have some trivia all about EF after the presentation...so stick around!
12/18/2012