Self-bondage system - for whom?
For starters, I will have to state that I am not into heavy BDSM – I merely like to dabble here and there, like a bit of humiliation, not much, bondage a lot, no pain though… So for those who are into the lifestyle heavily, this might be useless and lame. For those who are merely curious but adventurous, those who aren’t sure what they want but would like to experiment, or who have been touched a bit by Fifty Shades of Grey, it might offer some good advice.
This system can be used with a partner too, if you are both new to BDSM and unsure about your limits. It will provide a secure hold while you will know that you can get free any minute you are too uncomfortable or you feel in danger – in case your partner gets carried away, and they can be calm that as long as you don’t get free by yourself, you are ok with what’s happening. (Yeah, safe words exist for that, but if your significant other slips and breaks a leg and you need to call 911, shouting a word won’t get you to the phone.)
And why?
I indulge myself in self-bondage from time to time for several reasons. Currently, my partner lives far away and that’s the only way I can get to feel the sweet feeling of being restrained. It can be a lot of work to put such a system together, but very rewarding in the end. Of course, you can also buy under the bed systems from Sportsheets for example, but for me, they have a major drawback. I love to tug on my bonds. I love to feel stretched out, “forced” into a position, and unable to move. Thing is, if you tug on a Velcro cuff enough, it will come free sooner or later. Also they offer little on the field of versatility.
And tying your own hands up tightly isn’t an easy feat to do – tying it up tight and being able to get free if you need to, it is close to impossible. And being able to get free fast can be very important – while house fires, police raids and heart attacks aren’t everyday events in your life (thank God for that), a surprise visit from mother in law or the postman can happen anytime. So better safe than sorry.
This sent me thinking: what could I use to create a steady and secure bond with? Something I could pull on all I wanted, but not be able to escape unless I decided I wanted to? Something that would offer a versatile use, easy to tie, and easy to untie. And a brilliant idea formed in my head when I took out my lash next day. The lash connected to the collar with a carabiner. So why not use them to connect other things too?
What you will need
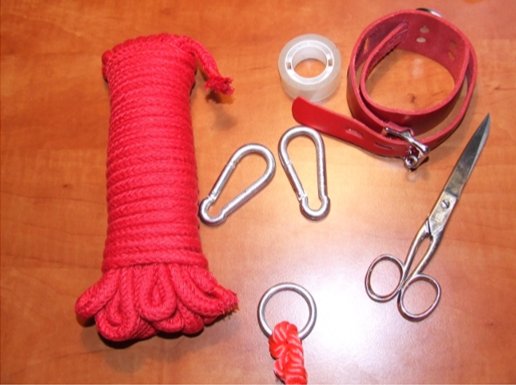
- a good length of rope
It does not have to be bondage rope as they will not really come in contact with skin. On the other hand, bondage rope makes for a nicer looking system, and definitely durable enough to hold you in position.
- cuffs, ankle cuffs, thigh cuffs, bondage belt, etc.
If you are reading this article, you probably already own some or more of these. These are good to have for the purpose but not strictly necessary. You can create the cuffs from rope, but if you choose to do so, it has to be a bondage rope. To learn more about different ropes, see my other article on them. The more you own of these, the more versatile you can make your bondage, but so can you by tying a rope harness. If you choose to opt for rope, visit www.twistedmonk.com for video guides on how to tie cuffs and harnesses. If you choose a rope cuff, you need to include a curtain ring into it to mimic the D-rings cuffs have built into them. If you are going with cuffs, you might want to buy the leather variety as they are very comfortable spreading the pressure on a big surface and not opening by mistake. Try to avoid the policeman-style cuffs as they do open under pressure and cut into the skin.
- carabiners
You will need lots of these, at least one for all limbs, but if you want to spice things up and make some more interesting positions, you will need more. They aren’t that expensive so buy a bunch to keep things versatile. Size does not really matter – smaller ones make for a tighter, more snug fit in the end, but they are also more difficult to close. If you wish to tie both of your hands, you have to buy a big one for your dominant hand – you have to be able to reach the opening of the carabiner with your hand tied, and you will only be able to do that if the carabiner is big enough. So remember, one big one for the last hand!
- curtain hoops/rings
These will create the attachment points for your self-tie-up system. You need at least 4 of them for the simplest version, more if you want to do something more exciting. Also they are cheap, so get a bunch!
- A pair of scissors
For cutting the rope to the right length.
- clear adhesive tape (such as Sellotape)
It is not strictly necessary, but I like to secure the knots that hold the curtain rings in place to make sure they will not come loose in the middle of a tugging session, that would just defile the purpose.
]
There are so many naughty (knotty) things you can do with this rope. Believe me, my pu**y was soaking wet as I thought about the many possibilities. – DancerKittyKat | https://www.edenfantasys.com/bondage-and-fetish/cuffs-and-restraints/basic-cotton-rope| Basic cotton rope]
- Thin cord
This system I will create as a demonstration consists of several curtain-ring-ended ropes, and their relative position to each other is important too. The thin cord is used for this purpose, to tie them together at the correct intervals and distances, so next time you only need to take the rope system out of the drawer and do not need to play around with where to put which rope. A thin cord of thin hemp rope is better for this purpose than bondage rope as the thinner cords can tie a more secure knot, something that is less likely to move around. Thicker ropes make bigger, clumsier knots that can come loose more easily.
- Time
The first time you put the system together, you will need to experiment a lot on how long the ropes should be between the rings. So leave plenty of undisturbed time, or ask your partner to help you if they want to. It will make taking measurements easier.
- Imagination
I will show you here how to create a basic tie-up system, but with the incorporation of different furniture, differently placed ropes, and rings, you can create pretty much any position.
How to prepare
Here I am going to show how to create a tie-up system for missionary pose, legs spread and knees pulled up, all in a way that you would not be able to move.
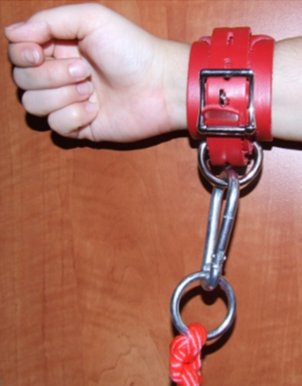
First, let’s take one of the ropes and tie a curtain ring at the end. So far, so good. I would secure the tie with Sellotape so it could not possibly come free. Put a carabiner on the ring – this is how you will tie your hand to the ring. You need to have the carabiner in place for the measurement as it has some length, and ignoring it would make for a loose system.
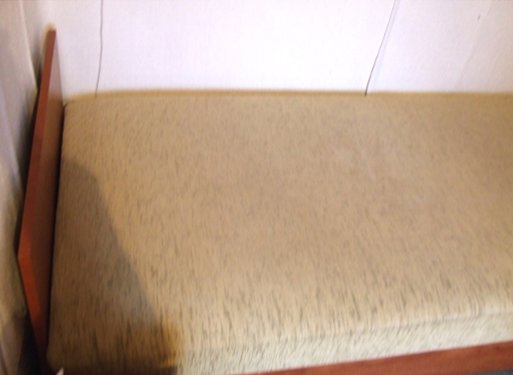
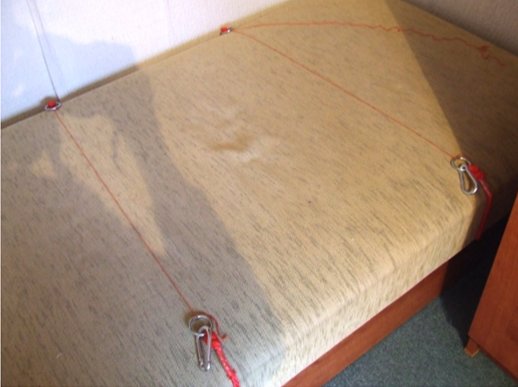
Good, now let’s go to the bed! Put on your cuffs, or create the rope cuffs you are going to use, and lie down on the bed. Position your limbs to where you want them to be tied. Now take the curtain ring (with the carabiner) in one hand without moving the other from the preferred position. Place the ring on the bed right at the other wrist where you want it tied. You want to keep the loop in place for a while. You could use some pins to secure it there for a shorter time, or put something heavy that would hold it down. Pull the rope under the bed, and out on the other side. If you have a bed that has no “under," like in this picture below, you should lift the mattress off the bed and leave the rope there (like on the next picture).
Excellent! Now lower the mattress (or just put the leftover rope over the bed), lie back on the bed, position the limbs, check where you want the other arm, and pull the rope tightly to that spot so it would be straight under the bed. Be sure there is no sagging. This is an important thing to do right if you want a tight fit. You might need to keep the ring you have already positioned in place with your other hand to insure it would not tear the pins out or move away. Put your finger on the rope where you want the other ring, get off the bed, and tie the ring to the right spot.
Keep in mind that the ring has a diameter and the carabiners have a length! So the rope+ring+carabiner will be longer than the spot you have chosen. You might want to subtract that length from the rope before tying. Make sure you leave enough of a give so you will be able to secure the carabiners to the hoops. Once tied, check if it is the right length. Lie back down and measure. If you are satisfied, secure the knot with Sellotape and cut off the remaining rope.
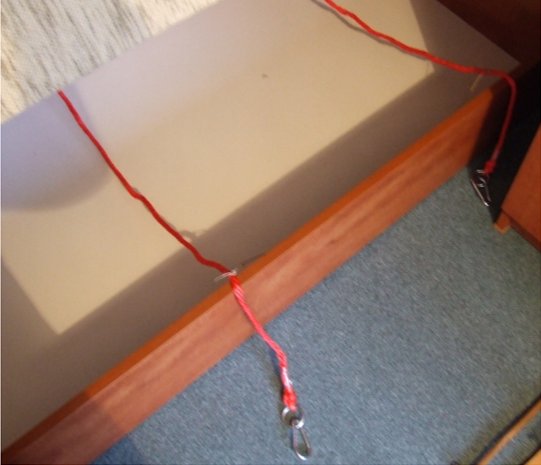
Congratulations, one rope is done! If you want to insure the rings cannot move around, you can tie them together on the surface of the bed with a thin cord as seen in the picture below:
Now repeat the same procedure for your ankles. If you want to tie the hands and ankles at the same distance from the edge of the bed, you can simply copy the length of the rope you already created, which will spare a lot of trouble.
As we are doing a walk through with a legs-bent-position system, the angle of the knee is very important. To insure it cannot change, we will make a tie between your ankle cuffs and tight cuffs (of bondage belt or harness, whatever you want to use). Take a length of rope, tie one carabiner to one end, and secure the knot. Click the carabiner onto your ankle cuff while your leg is bent at the desired position, and measure where the other carabiner needs to be. Tie it to the rope, check the distance, secure the not, and cut off the excess of rope. Create an exact duplicate for the other leg. This will give you a tie that insures you cannot stretch your leg.
Something about thigh cuffs (or rope thigh cuffs, really no difference here) you need to know is that unless some force pulls them up to keep them in place, they will tend to slide down your legs simply because your legs are thicker closer to the butt and thinner at the knee. Therefore we need another securing point to keep those thigh cuffs in place. If you have a bondage belt, you can duplicate the "tie the ankle to the thigh cuffs" part as tie the thigh cuffs to the bondage belt. But I do not have one. Also, securing the thighs to the ankles still allows you to move your knee by opening and closing the legs, which for me is a no no.
What we will do here is to add a third rope like we used for the ankles and hands. So, tie a ring to the end of the rope, secure it to the thigh cuff with carabiner, pull the rope under the bed or under the mattress, lie on the bed and pull the rope tight for positioning the other ring. Keep in mind that this rope should not be in line with the cuffs! They should be placed somewhat higher to have the “pulling the thigh cuffs back in place effect." The length of this rope will determine how far your legs will be forced open.
Measure where you want the ring, tie the rope to it, and check the length. If it is good, secure the knot and rut the rope. By this time your system should look something like this: (the picture does not show the hand cuffs because it did not fit into one frame, but they should be there, just higher up the bed.)
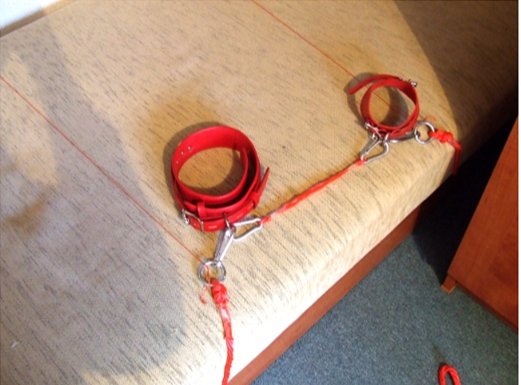
Nearly done. Only one thing left to do. Take the thin cord and tie the 3 ropes together in a net to insure the distance between them will not change. See picture:
If you are worried that the loops would move around on the bed too much, you can tie them together with the thin cord in the same way (it only works if the 3 ropes are the same length!). Also you can add one more cord that ends in double carabiners. Attach carabiner to the ring for the arm, lead the cord to the head of the bed, under the bed, along the length of the bed (still under) up at the foot of the bed, and attach the other carabiner to the foot ring. Now the rings are secured in place both horizontally and vertically so they won’t be able to budge. Also they are placed at the perfect intervals for you!
Adding more variety
Now if you completed this, you already get the general idea how such systems can be created. You could tie those rings to different pieces of furniture: tie 4 rings to a chair or a small coffee table to enforce doggy style, tie them to the feet of a desk at one side and lead the ropes up high on the other to get a bent over the table position, arm stretched before you – you get the general idea. You can play around to find the position you like most – and the experimenting in itself can be rewarding.
Play safe, have fun!